

How To Save Column Width In Excel
sIf you observe yourself needing to expand or reduce Excel's row widths and column heights, in that location are several ways to adjust them. The tabular array beneath shows the minimum, maximum and default sizes for each based on a point scale.
| Type | Min | Max | Default |
|---|---|---|---|
| Column | 0 (hidden) | 255 | 8.43 |
| Row | 0 (hidden) | 409 | xv.00 |
Notes:
-
If you are working in Page Layout view (View tab, Workbook Views group, Page Layout button), yous tin can specify a column width or row height in inches, centimeters and millimeters. The measurement unit is in inches past default. Go to File > Options > Advanced > Display > select an option from the Ruler Units list. If you lot switch to Normal view, and so column widths and row heights will be displayed in points.
-
Individual rows and columns can only take one setting. For example, a single column can have a 25 point width, but it can't be 25 points broad for one row, and 10 points for another.
Set a cavalcade to a specific width
-
Select the column or columns that you want to change.
-
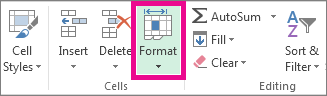
On the Habitation tab, in the Cells group, click Format.
-
Under Cell Size, click Column Width.
-
In the Column width box, type the value that you desire.
-
Click OK.
Tip:To apace set the width of a single column, right-click the selected cavalcade, click Column Width, blazon the value that you want, and then click OK.
-
Select the column or columns that you want to change.
-
On the Home tab, in the Cells grouping, click Format.
-
Under Cell Size, click AutoFit Cavalcade Width.
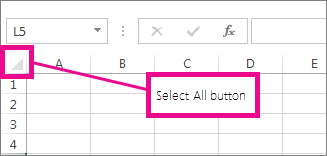
Annotation:To quickly autofit all columns on the worksheet, click the Select All push, and so double-click any boundary between two cavalcade headings.
-
Select a cell in the cavalcade that has the width that you desire to use.
-
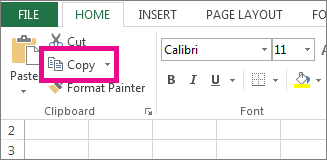
Press Ctrl+C, or on the Home tab, in the Clipboard group, click Copy.
-
Correct-click a cell in the target column, point to Paste Special, and then click the Proceed Source Columns Widths
 button.
The value for the default column width indicates the average number of characters of the standard font that fit in a jail cell. Y'all tin specify a different number for the default column width for a worksheet or workbook.
-
Do ane of the post-obit:
-
To change the default cavalcade width for a worksheet, click its sheet tab.
-
To alter the default cavalcade width for the entire workbook, right-click a sheet tab, and so click Select All Sheets on the shortcut menu.

-
-
On the Home tab, in the Cells group, click Format.
-
Under Prison cell Size, click Default Width.
-
In the Standard column width box, blazon a new measurement, and then click OK.
Do i of the following:
-
To change the width of one cavalcade, drag the purlieus on the right side of the column heading until the cavalcade is the width that you want.
-
To change the width of multiple columns, select the columns that you want to modify, and so drag a boundary to the right of a selected column heading.
-
To change the width of columns to fit the contents, select the column or columns that y'all want to change, and then double-click the boundary to the right of a selected column heading.
-
To modify the width of all columns on the worksheet, click the Select All button, and so elevate the boundary of whatsoever column heading.
-
Select the row or rows that you lot want to alter.
-
On the Home tab, in the Cells grouping, click Format.
-
Under Cell Size, click Row Tiptop.
-
In the Row tiptop box, blazon the value that you desire, and so click OK.
-
Select the row or rows that you lot want to change.
-
On the Home tab, in the Cells group, click Format.
-
Nether Cell Size, click AutoFit Row Height.
Tip:To speedily autofit all rows on the worksheet, click the Select All button, and then double-click the boundary beneath one of the row headings.
Practice 1 of the following:
-
To change the row height of one row, drag the boundary below the row heading until the row is the height that you want.

-
To change the row summit of multiple rows, select the rows that you lot want to modify, and so elevate the boundary below 1 of the selected row headings.
-
To change the row height for all rows on the worksheet, click the Select All button, so drag the boundary below whatever row heading.
-
To modify the row height to fit the contents, double-click the boundary below the row heading.
Top of Folio
If you adopt to work with column widths and row heights in inches, you lot should work in Folio Layout view (View tab, Workbook Views group, Page Layout push). In Page Layout view, y'all can specify a column width or row height in inches. In this view, inches are the measurement unit by default, merely y'all can alter the measurement unit to centimeters or millimeters.
-
In Excel 2007, click the Microsoft Function Button
 > Excel Options> Avant-garde.
 -
In Excel 2010, go to File > Options > Advanced.
Gear up a column to a specific width
-
Select the column or columns that you want to change.
-
On the Dwelling house tab, in the Cells group, click Format.

-
Under Cell Size, click Column Width.
-
In the Column width box, type the value that you lot want.
-
Select the cavalcade or columns that you want to change.
-
On the Home tab, in the Cells group, click Format.
-
Under Jail cell Size, click AutoFit Column Width.
Tip To quickly autofit all columns on the worksheet, click the Select All button and then double-click whatever boundary between two column headings.

-
Select a cell in the column that has the width that you lot want to use.
-
On the Dwelling tab, in the Clipboard grouping, click Copy, so select the target cavalcade.

-
On the Dwelling house tab, in the Clipboard grouping, click the arrow below Paste, and and then click Paste Special.
-
Under Paste, select Column widths.
The value for the default cavalcade width indicates the average number of characters of the standard font that fit in a cell. You lot can specify a dissimilar number for the default cavalcade width for a worksheet or workbook.
-
Exercise one of the following:
-
To change the default column width for a worksheet, click its sheet tab.
-
To change the default column width for the entire workbook, correct-click a sheet tab, and then click Select All Sheets on the shortcut menu.

-
-
On the Home tab, in the Cells grouping, click Format.
-
Under Cell Size, click Default Width.
-
In the Default cavalcade width box, blazon a new measurement.
Tip If yous want to define the default column width for all new workbooks and worksheets, yous can create a workbook template or a worksheet template, and then base new workbooks or worksheets on those templates. For more information, see Save a workbook or worksheet equally a template.
Do one of the following:
-
To modify the width of one column, drag the boundary on the correct side of the column heading until the column is the width that you desire.
-
To change the width of multiple columns, select the columns that you lot want to change, and and so drag a boundary to the correct of a selected column heading.
-
To change the width of columns to fit the contents, select the column or columns that you want to change, and then double-click the boundary to the right of a selected column heading.
-
To change the width of all columns on the worksheet, click the Select All button, and and then drag the boundary of any column heading.
-
Select the row or rows that y'all want to change.
-
On the Home tab, in the Cells group, click Format.
-
Under Cell Size, click Row Height.
-
In the Row superlative box, type the value that you want.
-
Select the row or rows that you want to modify.
-
On the Home tab, in the Cells group, click Format.
-
Under Prison cell Size, click AutoFit Row Peak.
Tip To rapidly autofit all rows on the worksheet, click the Select All button then double-click the boundary below ane of the row headings.
Do 1 of the following:
-
To change the row height of ane row, elevate the purlieus beneath the row heading until the row is the pinnacle that y'all want.
-
To change the row summit of multiple rows, select the rows that yous want to change, and then elevate the boundary below one of the selected row headings.
-
To change the row height for all rows on the worksheet, click the Select All button, then drag the boundary below any row heading.
-
To change the row height to fit the contents, double-click the purlieus beneath the row heading.
Peak of Folio
See Also
Change the column width and row height in Excel for Mac
Change the cavalcade width and row height in Excel Online
Overview of formulas in Excel
How to avoid broken formulas
Discover and right errors in formulas
Excel keyboard shortcuts and office keys
Excel functions (alphabetical)
Excel functions (by category)

Source: https://support.microsoft.com/en-us/office/change-the-column-width-and-row-height-72f5e3cc-994d-43e8-ae58-9774a0905f46
Posted by: cooperappermak.blogspot.com
0 Response to "How To Save Column Width In Excel"
Post a Comment